Here we are going to go through the many ways you can install Minecraft mods on PC. This guide will also include ways to install mods for both PC versions of the game, Minecraft Java and Windows 10.
How to install mods using Forge for Java Minecraft
The first way to install mods for the Java version of Minecraft is to download and install Forge, a program you'll need to install mods and integrate them into the game.
But before downloading Forge, you will need to make sure that Java is installed and updated. To download Java, go to the official website here and click download, then wait for it to complete. After that, locate the downloaded installer in your downloads folder, double click on it and click on the install button. Once Java is installed, you can proceed to download and install Forge.
To download Forge, visit the official site here; you'll need to make sure you're downloading the correct version that matches the current version of Minecraft you're playing. If no version of Forge matches your current version of Minecraft, download the closest one. Also, if you're not sure which version of Minecraft Java you're playing, check the bottom left of the launcher for "latest versions".
When you find the correct version of Forge, click Install and wait for it to download. Once the download is complete, navigate to your downloads folder and double-click the installer.
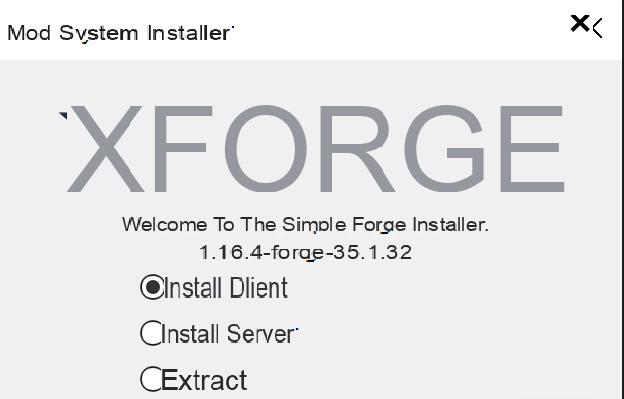
This will open the mod installer which will show two options, client and server; you will need to select the client option and choose your install location. After that, click OK and Forge will then install; wait for the process to complete and go to the next step.
Once Forge is installed for your current Java Minecraft version, you can then start installing Minecraft mods, and the main expectation to do so is to visit the CursedForge website. Before doing so, be sure to change your Minecraft launcher profile to the version of Forge you just installed. Then proceed to the next step in this guide.

CursedForge is a great source for mods, and using the search engine as shown above, you can find the type of mod you want to install. That said, take a few moments to browse the site for a few mods you want to install, but make sure they match the version of Minecraft you're playing before downloading.
When you upload your mods, you will need to move them into the Minecraft mods folder; you can usually find this folder in C:UsersyourusernameAppDataRoaming.minecraft on your PC.
If you don't have a folder labeled mods in .minecraft you can just create one now and label 'mods', when the folder is created move any mods you downloaded inside. Once all the mods are installed, you will have successfully installed all the mods, and all you have to do next is launch the Minecraft launcher.
How to Install Mods Using Modpack Launchers

Another easier way to install mods for Minecraft Java is to download a Modpack launcher. These launchers drastically reduce the time and pain required to install mods, allowing one-click installation of large installations of multiple mods.
There are also several mod launchers on the web, but in this guide we recommend using the Cruse Forge app as it is the easiest to grab. To get started, head over to Cruse Forge to download the latest version of their PC app, wait for it to download, then double-click the installer.
Related: How to Change Your Minecraft Skin
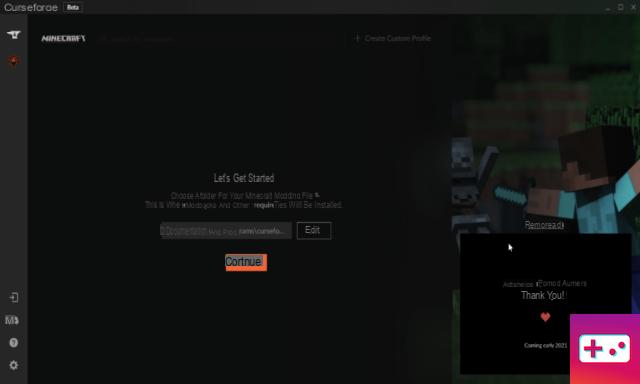
The application will then ask you where you want to install the program, choose a location, and then let it install. Once installed, you will then be taken on a mini-tour of all the app's features; want to skip that with the ability to do so.
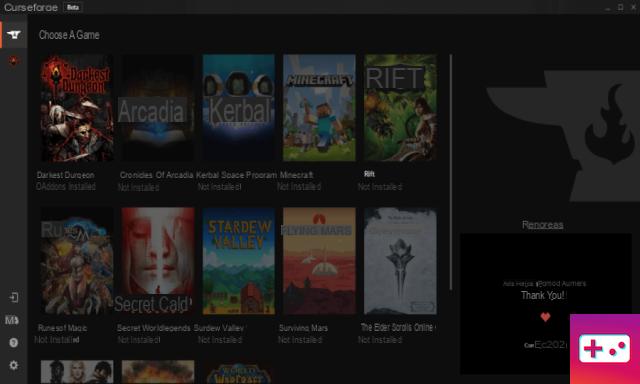
After the visit, you should see a list of games like the one above; click on the one that says Minecraft to go to the next step. Another tab will open, and here the program will ask you where you want to install the mod folder; select a location and click continue.
Once the app installation is complete, you will be able to download any modpack of your choice by hitting the “browse mods” button. As a side note, be careful downloading some mods, as some require a fairly robust PC with plenty of RAM to run them.
Related: Best Minecraft 1.16.3 Mods (January 2021)
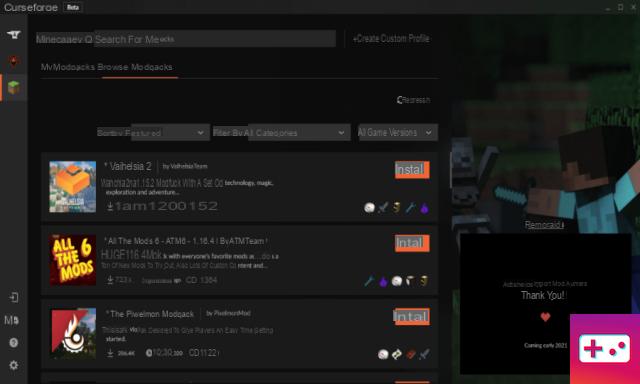
For this reason, we recommend that you make sure your PC can run the mod pack beforehand; some modpacks will have a recommended system specs section in the preview tab if you scroll down far enough.
You can also use the Cruse Forge app to create your own mods, which is basically the program doing the first step we've listed in the guide for you. To create a modpack, click on the button at the top right of your screen, shown in the image above.
Once clicked, it will open the next tab shown in the image above; here you will be able to change your minecraft java version, forge version and name the modpack. When you are done doing all this, click create and the app will create your modpack; after that, you can find your modpack under the "My Modpacks" tab.

Click My Modpacks to view your new modpack; from there, you can add mods, resource packs, and even custom maps. You can also edit the pack with several options next to the play button. But before playing with any of the settings and adding mods, you should note that the same rules apply as if you were manually installing mods.
This means that you must ensure that any mod you add works with the version of Forge and Minecraft Java you currently have installed; you will also need to ensure that any mods you add are compatible with each other.
How to Install Mods for Windows 10 Minecraft

To download and install mods for Windows 10 Minecraft, you can either buy and download addons from the Minecraft marketplace or download mods online like with Java Minecraft mods.
First, let's explain how to download and install mods for Windows 10 Minecraft; Before you start, please note that you will need to find mods designed for the Windows 10 version of Minecraft and not Java mods.
To get started, visit mcpedl.com and find a mod that matches your version of Minecraft and download it. Once downloaded, extract the mod with a program like 7-zip; once the extraction is complete, click on the mod and it will start Windows 10 Minecraft.
When the game starts, go to game settings and enable “use experimental game”. as some mods will require its activation to work. After enabling the option, click on resource packs and behavior packs on the left side of your screen and enable the mod, and after that you can start playing with your mod.
You can also get mods for Windows 10 Minecraft by purchasing or downloading them from the Minecraft Marketplace. To do this, simply go to the main menu and click on the marketplace option; another tab will appear displaying all the addons available in the market. By the way, you will have to use real money or Minecoins to buy anything from the Minecraft market.
For more on Minecraft, PGG has you covered. You can find both guides and news on almost anything game-related on our game page for Minecraft.