To install Minecraft mods, you usually need to download a modding app like Tech Launcher and AT Launcher; however, here we will explain how to install mods using the fodder curse app.
How to Install Minecraft Mods
To install Minecraft mods, you first need to download a program like Technic Launcher and AT Launcher; we recommend you to download Curse Forage app because it is one of the best out there. That said, start by going to the Curse Forge site and downloading the latest version of the app, waiting for it to download, then double-clicking the installer.
The installer will ask you where you want to install the program, select a location, and then let it install. Once installed, you will then be taken to visit all the features of the app; want to skip that with the ability to do so.
After the visit, you will see a list of games; click on the one that says Minecraft and go to the next step. Another tab will open soon after, and here the program will ask you where you want to install the mod folder; select a location and click continue.
Related: How to install Minecraft Mods on PC
Once the app installation is complete, you will be able to download any modpack you might want through the Curse Forge app. To download a modpack, click browse modpacks, then click the orange install button. As a side note, be careful downloading some mods, as some require a fairly robust PC with plenty of RAM to run them.
For this reason, it would be a good idea to make sure your PC can run the modpack before installing it. Luckily, some modpacks will tell you what specs they recommend in the preview tab if you scroll down far enough.
How to create your own modpack with curseforge
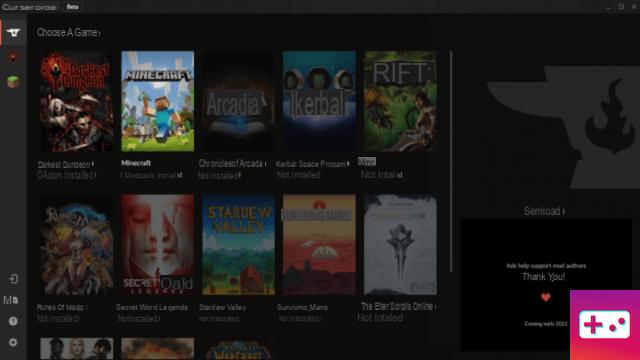
In addition to downloading mods and modpacks, you can also use the Curse Forge app to create your own modpacks. To create a modpack, click on the button that says create a custom profile at the top right of your screen. Once clicked, it will open a tab like the one in the image below.
In this tab you will be able to change your Minecraft Java version, Forge version and name the modpack. When you're done doing all of that, click create, and the app will create your modpack; after that you can find your modpack under My Modpacks tab.
Related: How to install Minecraft Mods on PC
From there, you'll be able to add mods, resource packs, and even custom maps. You can also edit the pack with several options next to the play button. But before playing with any of the settings and adding mods, you should note that the same rules apply as if you were manually installing mods.
This means that you must ensure that any mod you add works with the version of Forge and Minecraft Java you currently have installed; you will also need to ensure that any mods you add are compatible with each other.
To learn more about Minecraft, we at PGG have tons of awesome guides like Where to Find All the Flowers and How to Make Stained Glass in Minecraft